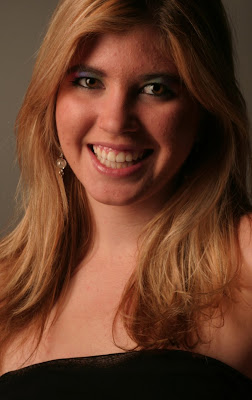
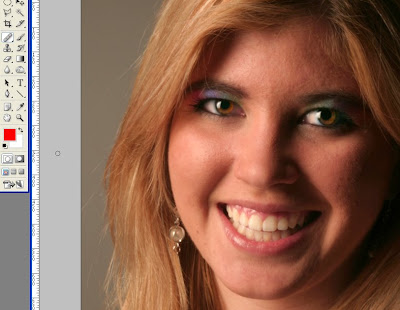
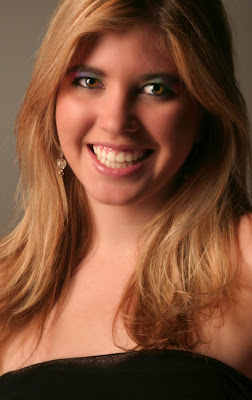
Here's my first tutorial ever! It's going to be awesome so read on! lol. I'm going to teach you how to brighten eyes and teeth, get rid of blemishes, smooth out skin tone, and add a cool effect. I'll start by showing you the before and after photos...
 Click to view larger.
We're going to start out by opening the file... you can get the photo I used by clicking the photo below and saving the large version on your computer.
Open it in Photoshop (I have Photoshop CS2, but it can be done with other versions, as well.)
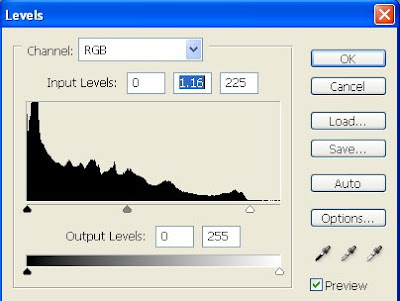
Step 1First we need to adjust the levels of the photo to make it brighter. Go to Image>Adjustments>Levels. Move the right slider(the white point slider) to the left where the histogram starts to get bumpy and the middle slider to the left a tiny bit(see image below):
 Step 2
Now we are going to brighten and enhance her eye color. Select the Polygonal Lasso tool and select one eye(by clicking in several spots until you have gone all the way around the eye ans returned to your first click). Now hold down Shift and select the other eye. Then go to Select>Feather and choose a value of about 6 pixels. Next open up the Levels dialog and move the white point slider to the start of the histogram (or however much you want, use your judgment.) Now we need to take away the red in the whites of her eye, so select the Gray Point eyedropper(see photo below) and use it to click on the white of her eye until the eyes look right to you.
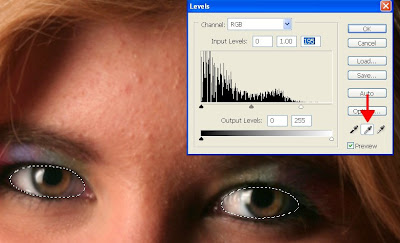
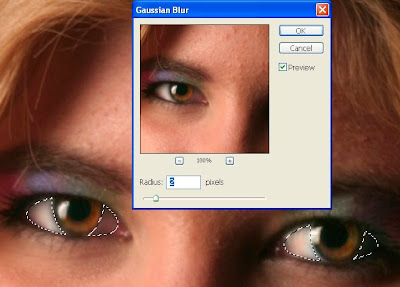
Now we are going to intensify the color, so go to Image>Adjustments>Hue/Saturation and move the Saturation slider to the right until you are satisfied with the results. I went to about +40. Good Job! Now with the eyes still selected, get your Elliptical Marquee Tool and hold down the Alt key while you drag over the Iris. This deselects the iris, but keeps the whites selected. Do this for both eyes. Now go to Filter>Blur>Gaussian Blur and enter a radius of about 2 pixels. After you've done that, you can deselect the eyes by typing Ctrl+D.
 Step 3
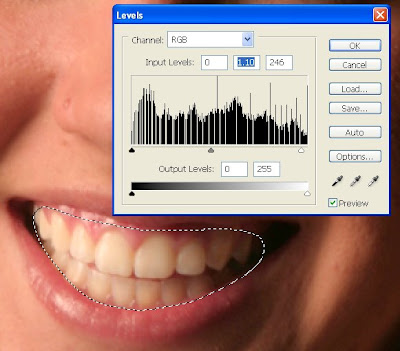
Now for the teeth! They need to be whitened. Get the Polygonal Lasso Tool and select the teeth. Don't worry if it's not perfect, you can have some gums in there, no big deal. Feather it about 6 pixels (just like with the eyes). Now open the Levels dialog and slide the white point slider to the left a little. Now slide the middle slider to the left a little till it looks good to you. Don't make the teeth too white, though. We don't want it to look too unnatural. When you are done, deselect the teeth by typing Ctrl+D.
 Step 4
Now it's time to get rid of all those blemishes. Zoom in to 200%. Press J and make sure the Healing Brush Tool is selected. Choose a brush that is about the size of a blemish (about 10 px) and 0% hardness. Now decide what blemish you are going to fix, then hold down the Alt key and click next to the blemish to sample that spot (in a smooth looking spot where the color matches the spot you are going to fix). Now you can let go of the Alt key and just click on the blemish. That's it! Do that wherever you see a blemish you would like to heal. Remember to take a new sample (by pressing alt and clicking) when needed. In the next step we will smooth out her face even more, so it doesnt have to be perfect. It should look something like this:
 Step 5
In this step we are going to smooth out her skin more. Duplicate the layer by going to Layer>Duplicate Layer. Now go to Filter>Blur>Gaussian Blur. Set the Radius to about 6 pixels and click OK. Now go to Layer>Layer Mask>Hide All. If you look in the layers palette you will see a black rectangle next to your layer. Make sure it is selected and click on the Paintbrush Tool. Select a brush that is about 65 pixels, and 0% hardness. Move the opacity of the brush to about 35% and the flow to 38%.
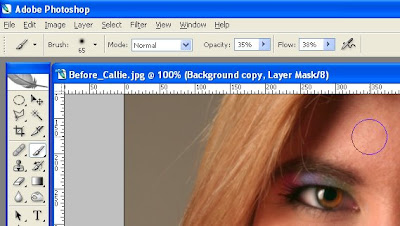
Make sure your forground color is white and start painting and clicking on her face. You can increase or decrease the brush size whenever you need to. Don't paint on the eyes or mouth or anything that you don't want blurred. But if you do paint over something on accident, just switch your forground color to black, and paint over the part you don't want blurred. (If you don't know how layer masks work, white adds the layer back in, and black erases it.) Be sure to get her neck, too. Anything that is skin, really. If you want to add detail back in after, like the smile lines, just select a smaller brush and, with black, paint over the lines so they get defined again. It should look something like this:
 Step 6
The last thing we are going to is just add a nice glow to the photo. First go to Layer>Flatten Image. Then Layer>Duplicate Layer. Now go to Image>Adjustments>Desaturate. Then Filter>Blur>Gaussian Blur and select a radius of about 20. Next, in the Layer Palette change the mode from Normal to Overlay and bring the Layer Opacity down to about 60%. And that's it! Here's the finished image:

I hope you enjoyed this tutorial and please let me know if you had any problems!